Hey! I’m a new user. I would like to know is it possible to track specific type of train from train booking website? variables: train name; departure time, seat availability
It should be possible @ikhabibullaev. Did you face any challenge monitoring them for availability?
Yes, I could not use it.
What problem did you encounter? If you can share more details about the use case and challenges faced, that will be great. Thanks!
Hey! Thanks for reaching out. We have 4 variables to track: date, train type, departure time & availability.
I want to create a notification if all these 4 variables match.
- How can I track the date?
- Train type is quite easy if the field equal to “Afrosiyob” word
- Departure time is also very easy, just departure time
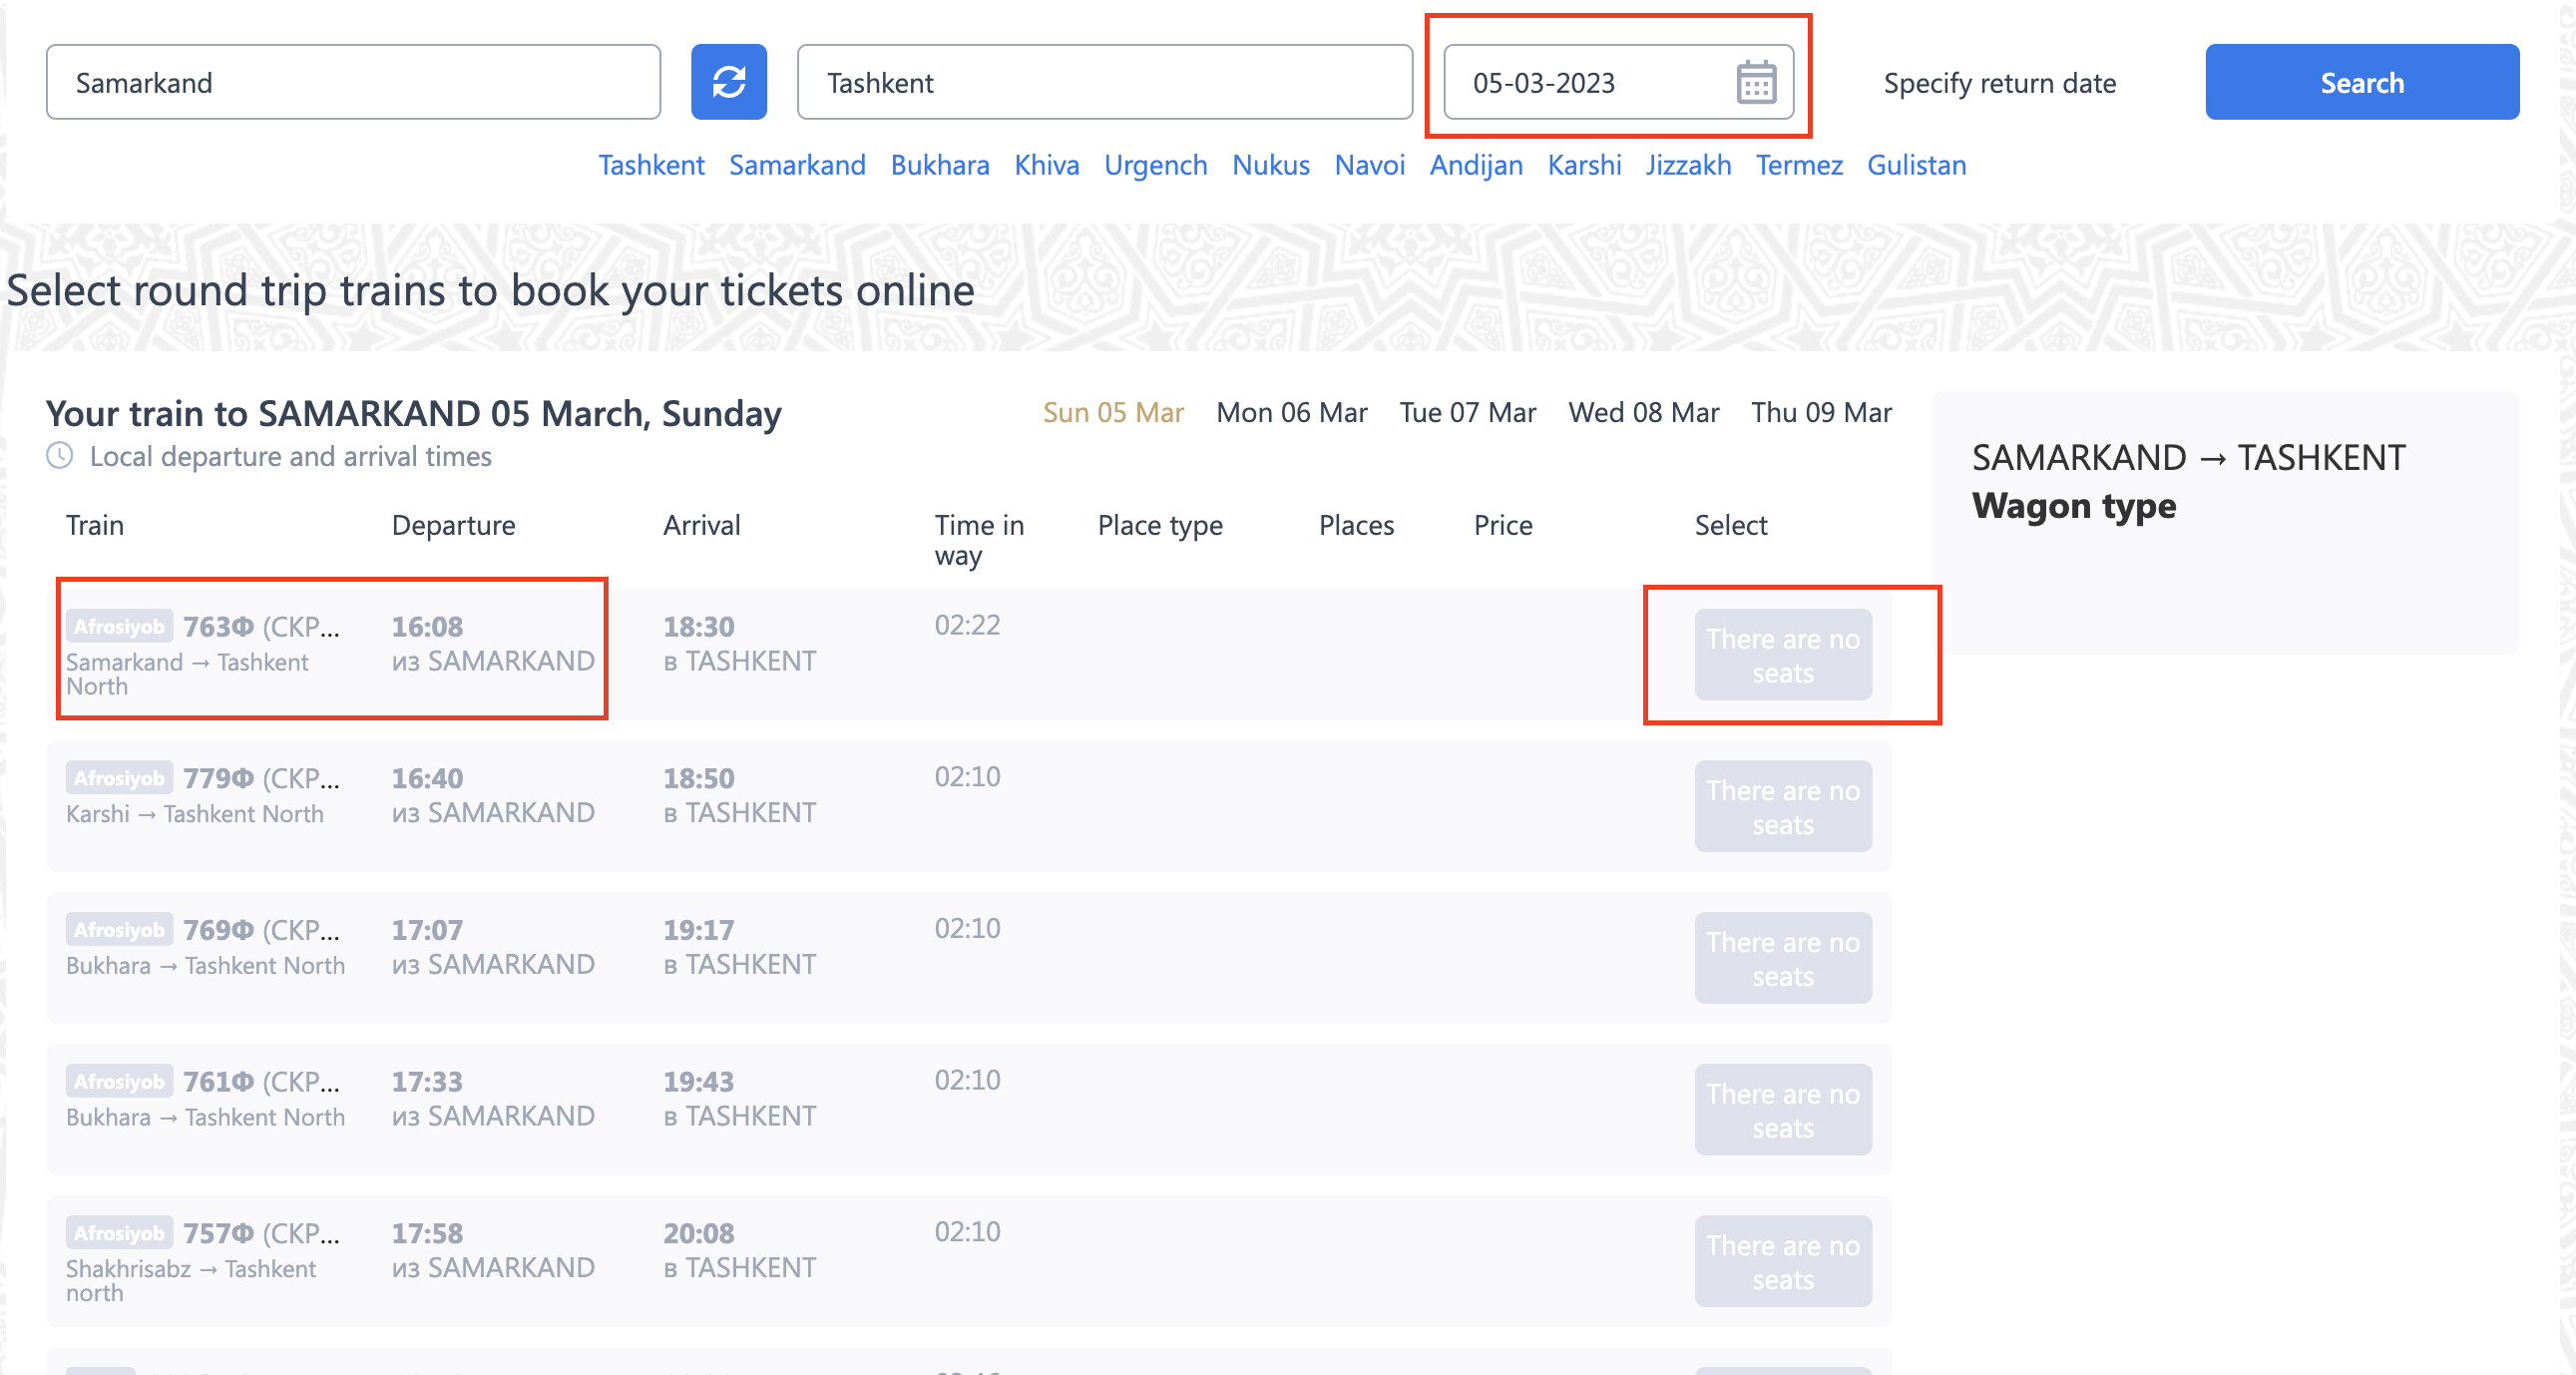
- Availability is quite complex, when there are no seats there’s always text that says no train available when there’s seats available they will list the number of seats available
- Class of the train we can track by price
I could not do all of these myself, I need some assistance to set up
Please refer to the attachment
Hi @ikhabibullaev ,
You want to filter the train list based on date, train type, starting and ending stations. And extract the filtered train list along with available number of seats. Would that be correct ? If incorrect, please explain your requirement in detail.
Also, can you please share the URL from which you want to monitor the data ?
Thanks.
Yes, it’s correct
Here’s the link: O'zbekiston Temir Yo'llari
Please follow the steps below to create the monitor:
- Save the following text into a “.json” file.
{"macros":[{"meta":{"url":"https://chipta.railway.uz/en/home"},"name":"chipta railway","spec":{},"steps":[["wait_doc",{"frame":0}],["click",["selector",{"meta":{},"type":"css","value":"[placeholder='From']"}],{"x":164.5,"y":11},{"frame":0}],["type",["selector",{"meta":{},"type":"css","value":"[placeholder='From']"}],"sam",{"frame":0}],["click",["selector",{"meta":{},"type":"css","value":"li.search-trains__dropdown__item:first-child"}],{"x":63.5,"y":20},{"frame":0}],["type",["selector",{"meta":{},"type":"css","value":".search-trains__input--to"}],"tashk",{"frame":0}],["click",["selector",{"meta":{},"type":"css","value":"li.search-trains__dropdown__item:nth-child(3)"}],{"x":71.890625,"y":14},{"frame":0}],["click",["selector",{"meta":{},"type":"css","value":"[alt='calendar\\ icon']"}],{"x":12.171875,"y":9},{"frame":0}],["click",["selector",{"meta":{},"type":"css","value":".ngb-dp-day[aria-label$='March 15, 2023']"}],{"x":16.28125,"y":13},{"frame":0}],["click",["selector",{"meta":{},"type":"css","value":"[type='submit']"}],{"x":82.0625,"y":24},{"frame":0}],["wait_for_element",["selector",{"meta":{},"type":"css","value":".direction__heading"}],{"frame":0}]],"version":1}]}
You can copy the above code, open your favourite text editor, paste the code and save the file in the following format filename.json.
- Go to distill’s watchlist page and click on the hamburger icon. In the menu, click on
Macros.
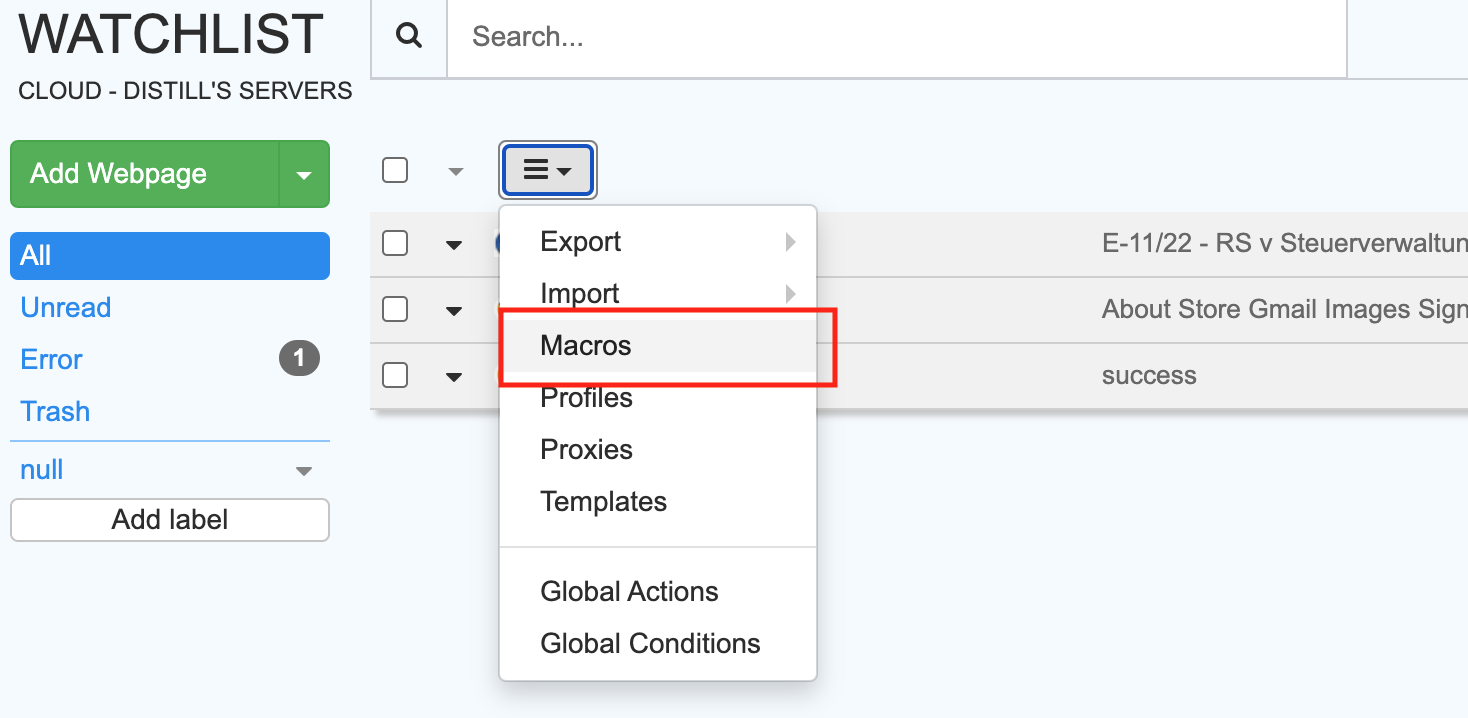
This will open the macros page.
- Click on the
Import Macrobutton and choose the saved json file to upload.
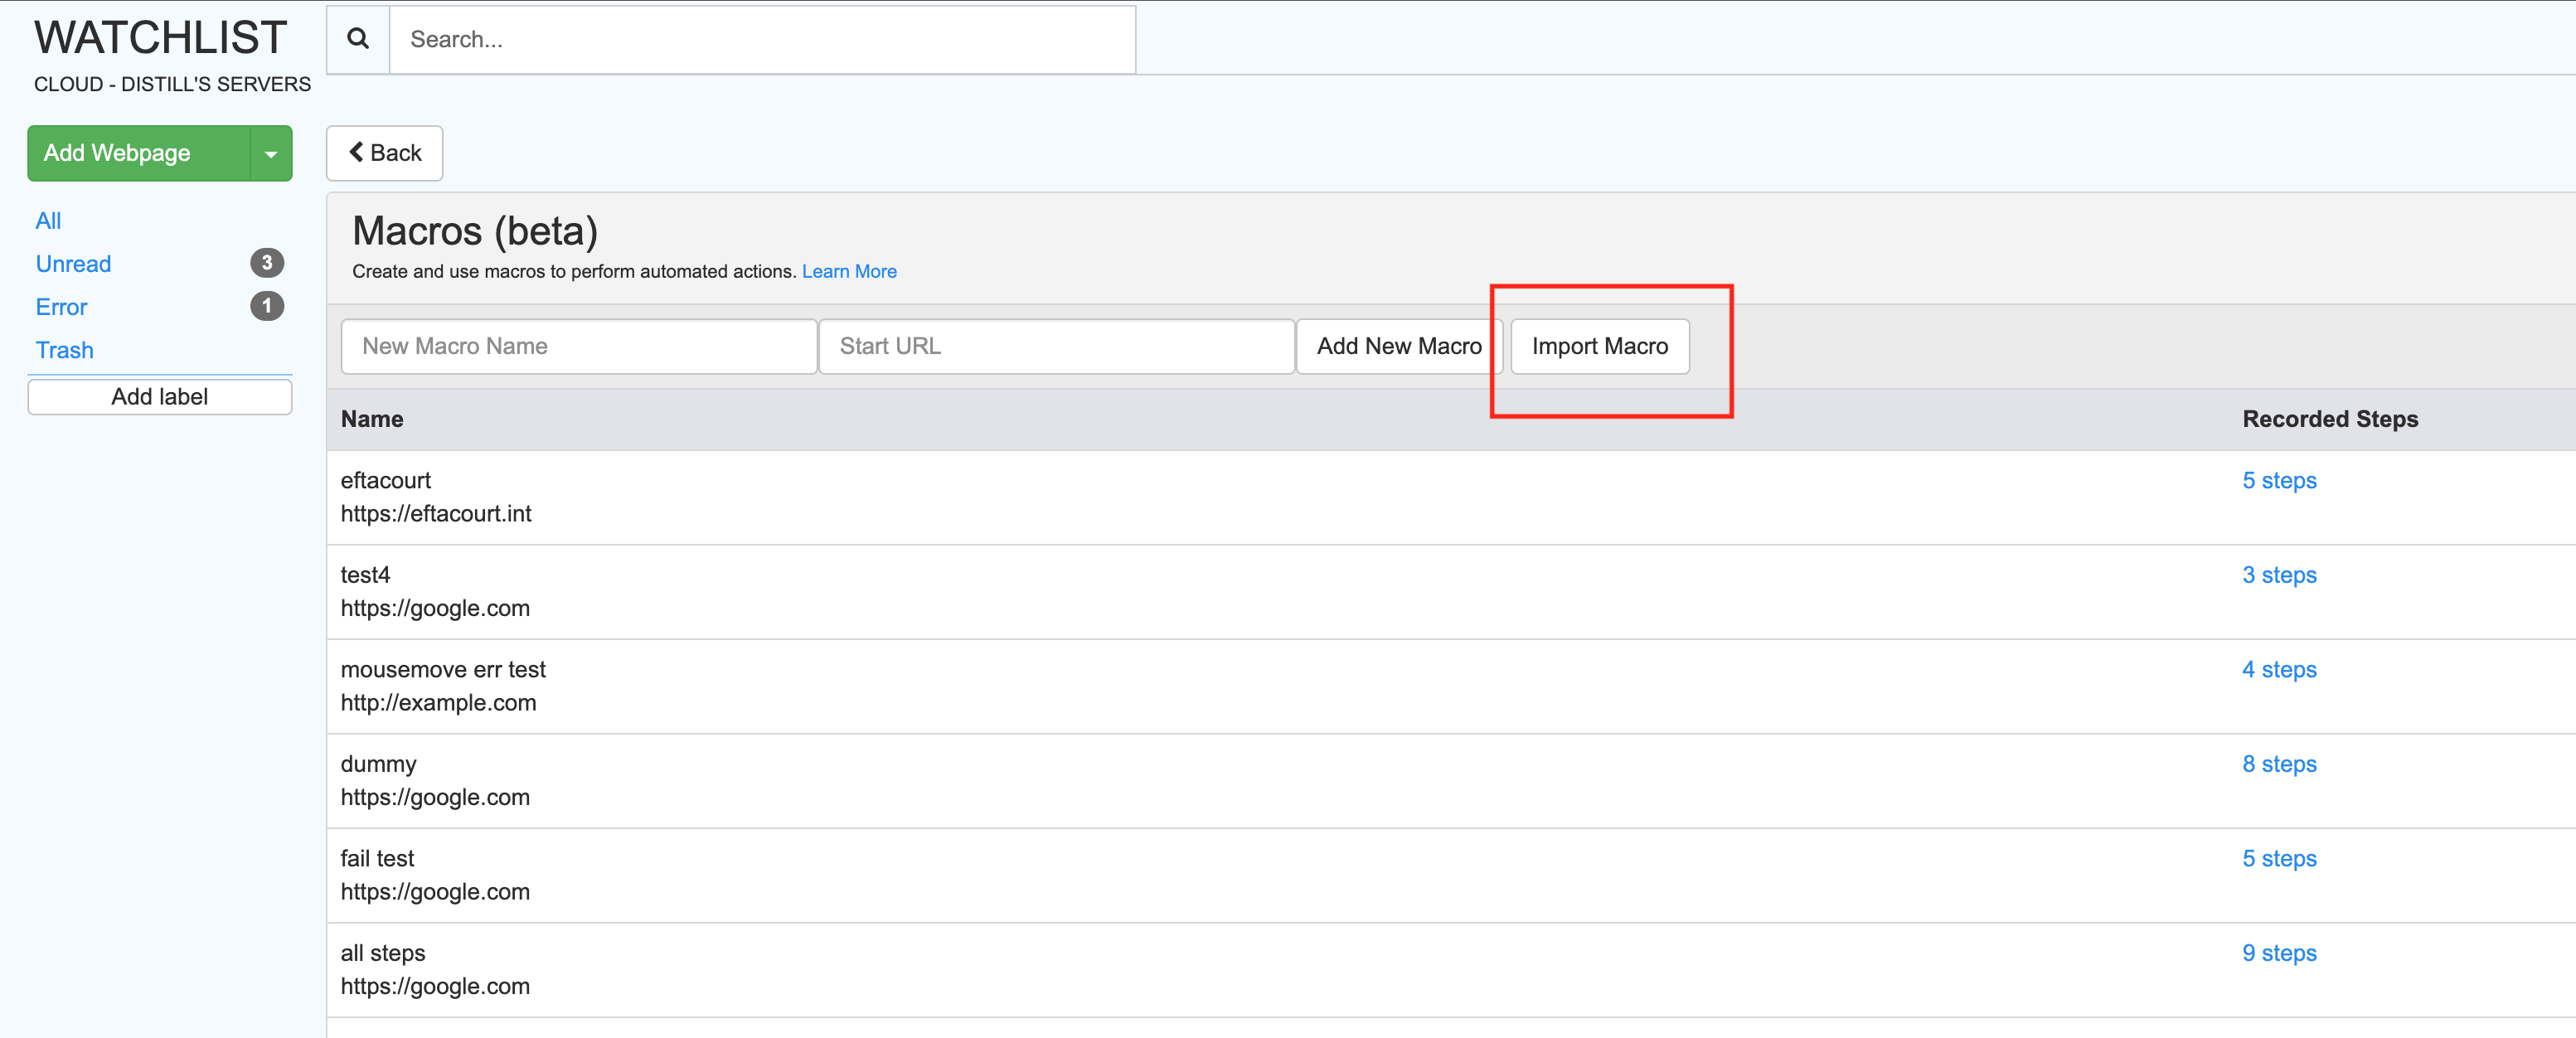
-
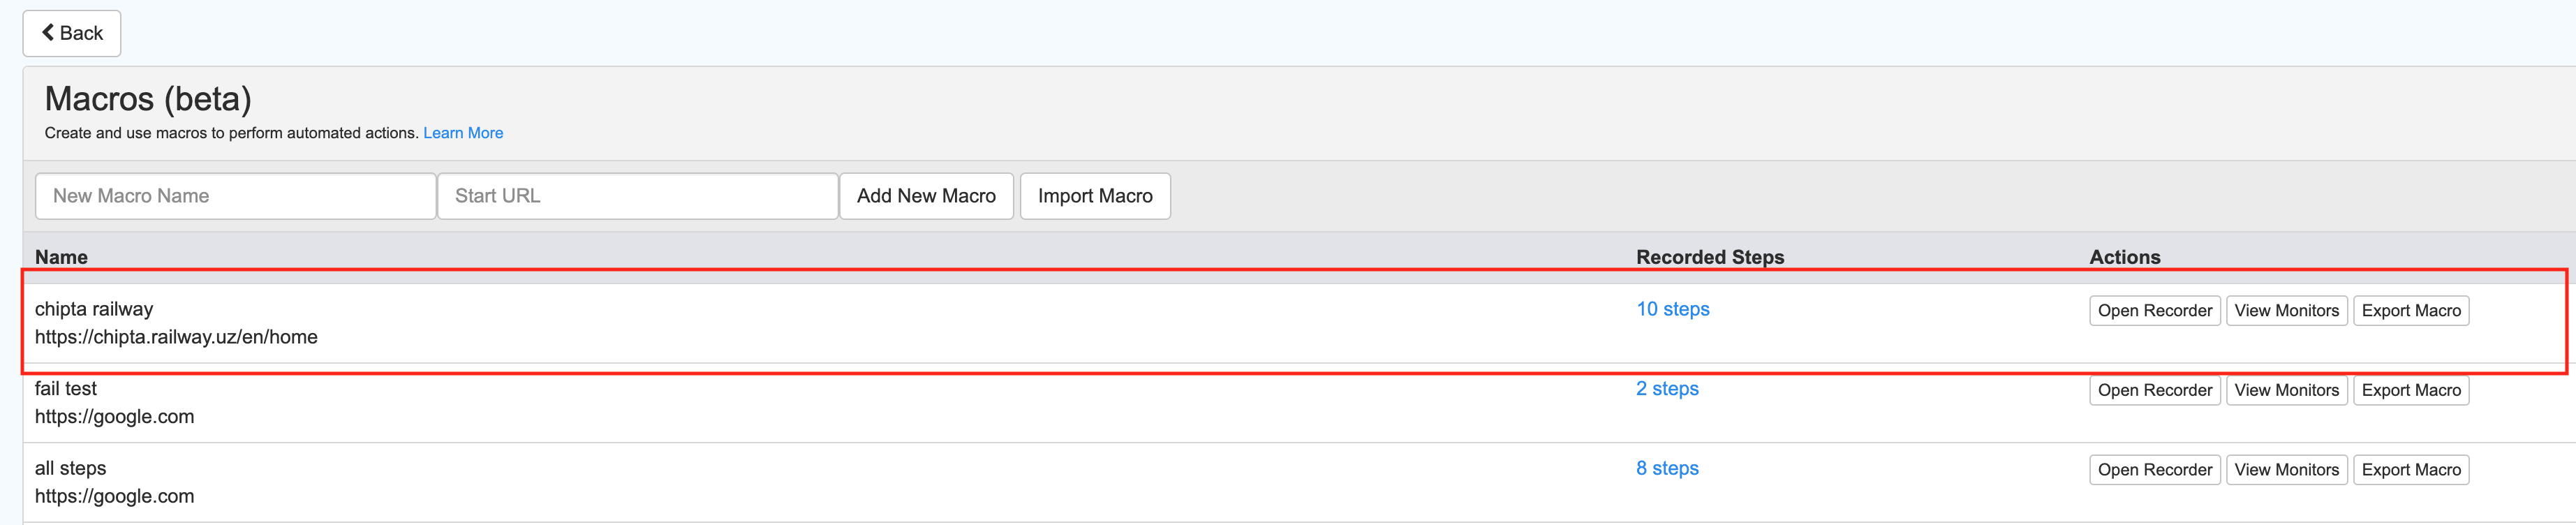
Once you upload the json file, you should see a new macro added with the name
chipta railway.
-
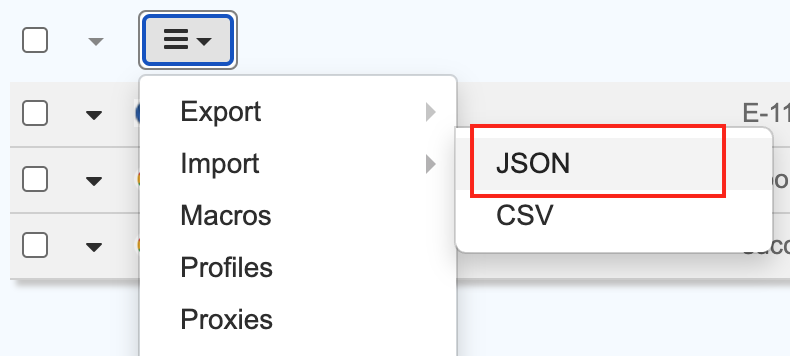
Now go back to distill’s watchlist page and click on the hamburger icon. In the menu, click on
Import > JSON.
-
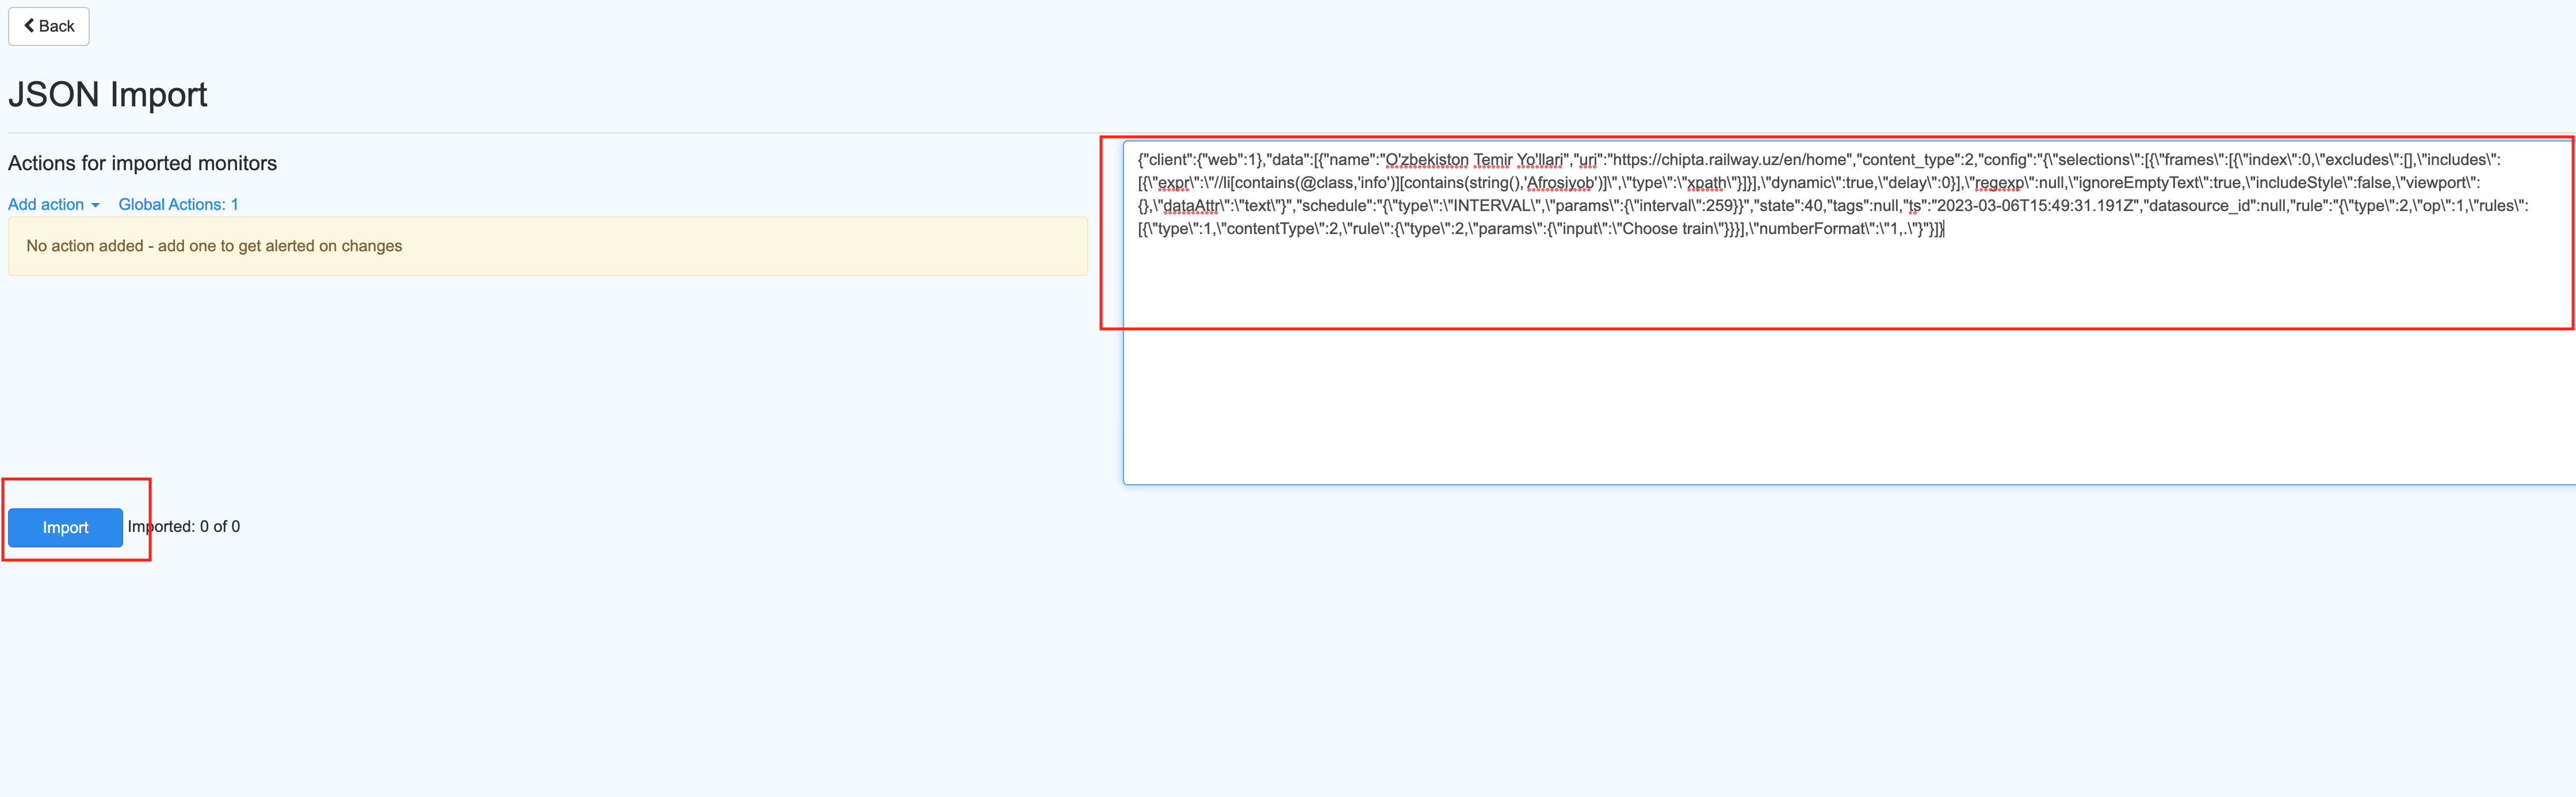
In the import page, paste the following config and click import.
{"client":{"web":1},"data":[{"name":"O'zbekiston Temir Yo'llari","uri":"https://chipta.railway.uz/en/home","content_type":2,"config":"{\"selections\":[{\"frames\":[{\"index\":0,\"excludes\":[],\"includes\":[{\"expr\":\"//li[contains(@class,'info')][contains(string(),'Afrosiyob')]\",\"type\":\"xpath\"}]}],\"dynamic\":true,\"delay\":0}],\"regexp\":null,\"ignoreEmptyText\":true,\"includeStyle\":false,\"viewport\":{},\"dataAttr\":\"text\"}","schedule":"{\"type\":\"INTERVAL\",\"params\":{\"interval\":259}}","state":40,"tags":null,"ts":"2023-03-06T15:49:31.191Z","datasource_id":null,"rule":"{\"type\":2,\"op\":1,\"rules\":[{\"type\":1,\"contentType\":2,\"rule\":{\"type\":2,\"params\":{\"input\":\"Choose train\"}}}],\"numberFormat\":\"1,.\"}"}]}
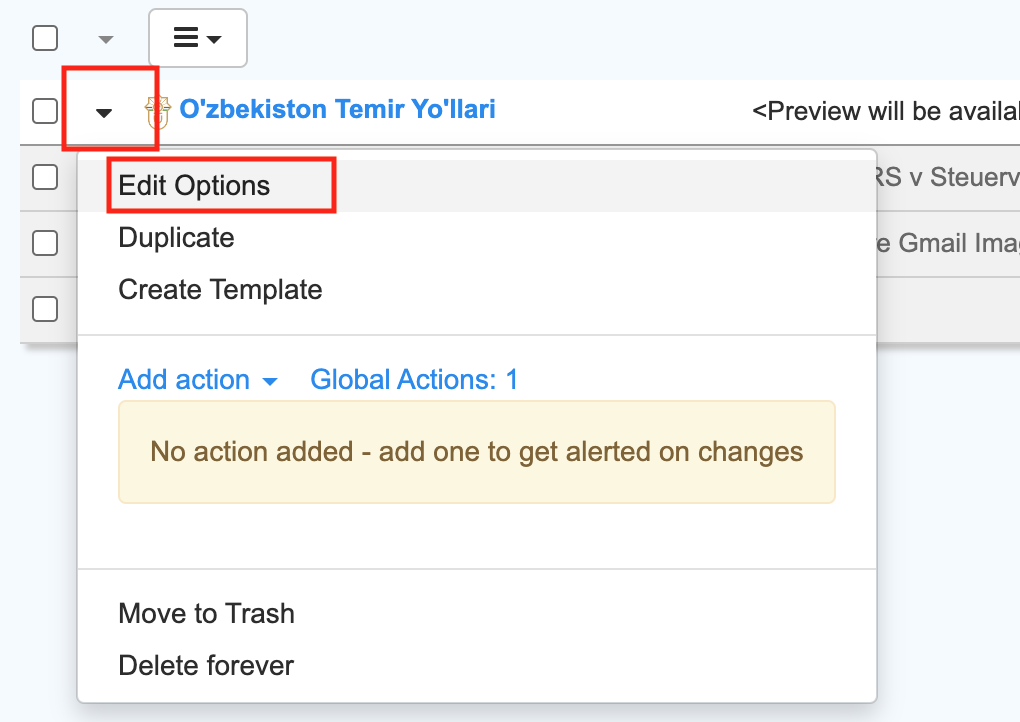
- Click on the back button to go back to Watchlist. You should be able to see your new monitor with name
O'zbekiston Temir Yo'llari. Click on thedownward triangle to the left of the name. ChooseEdit options.
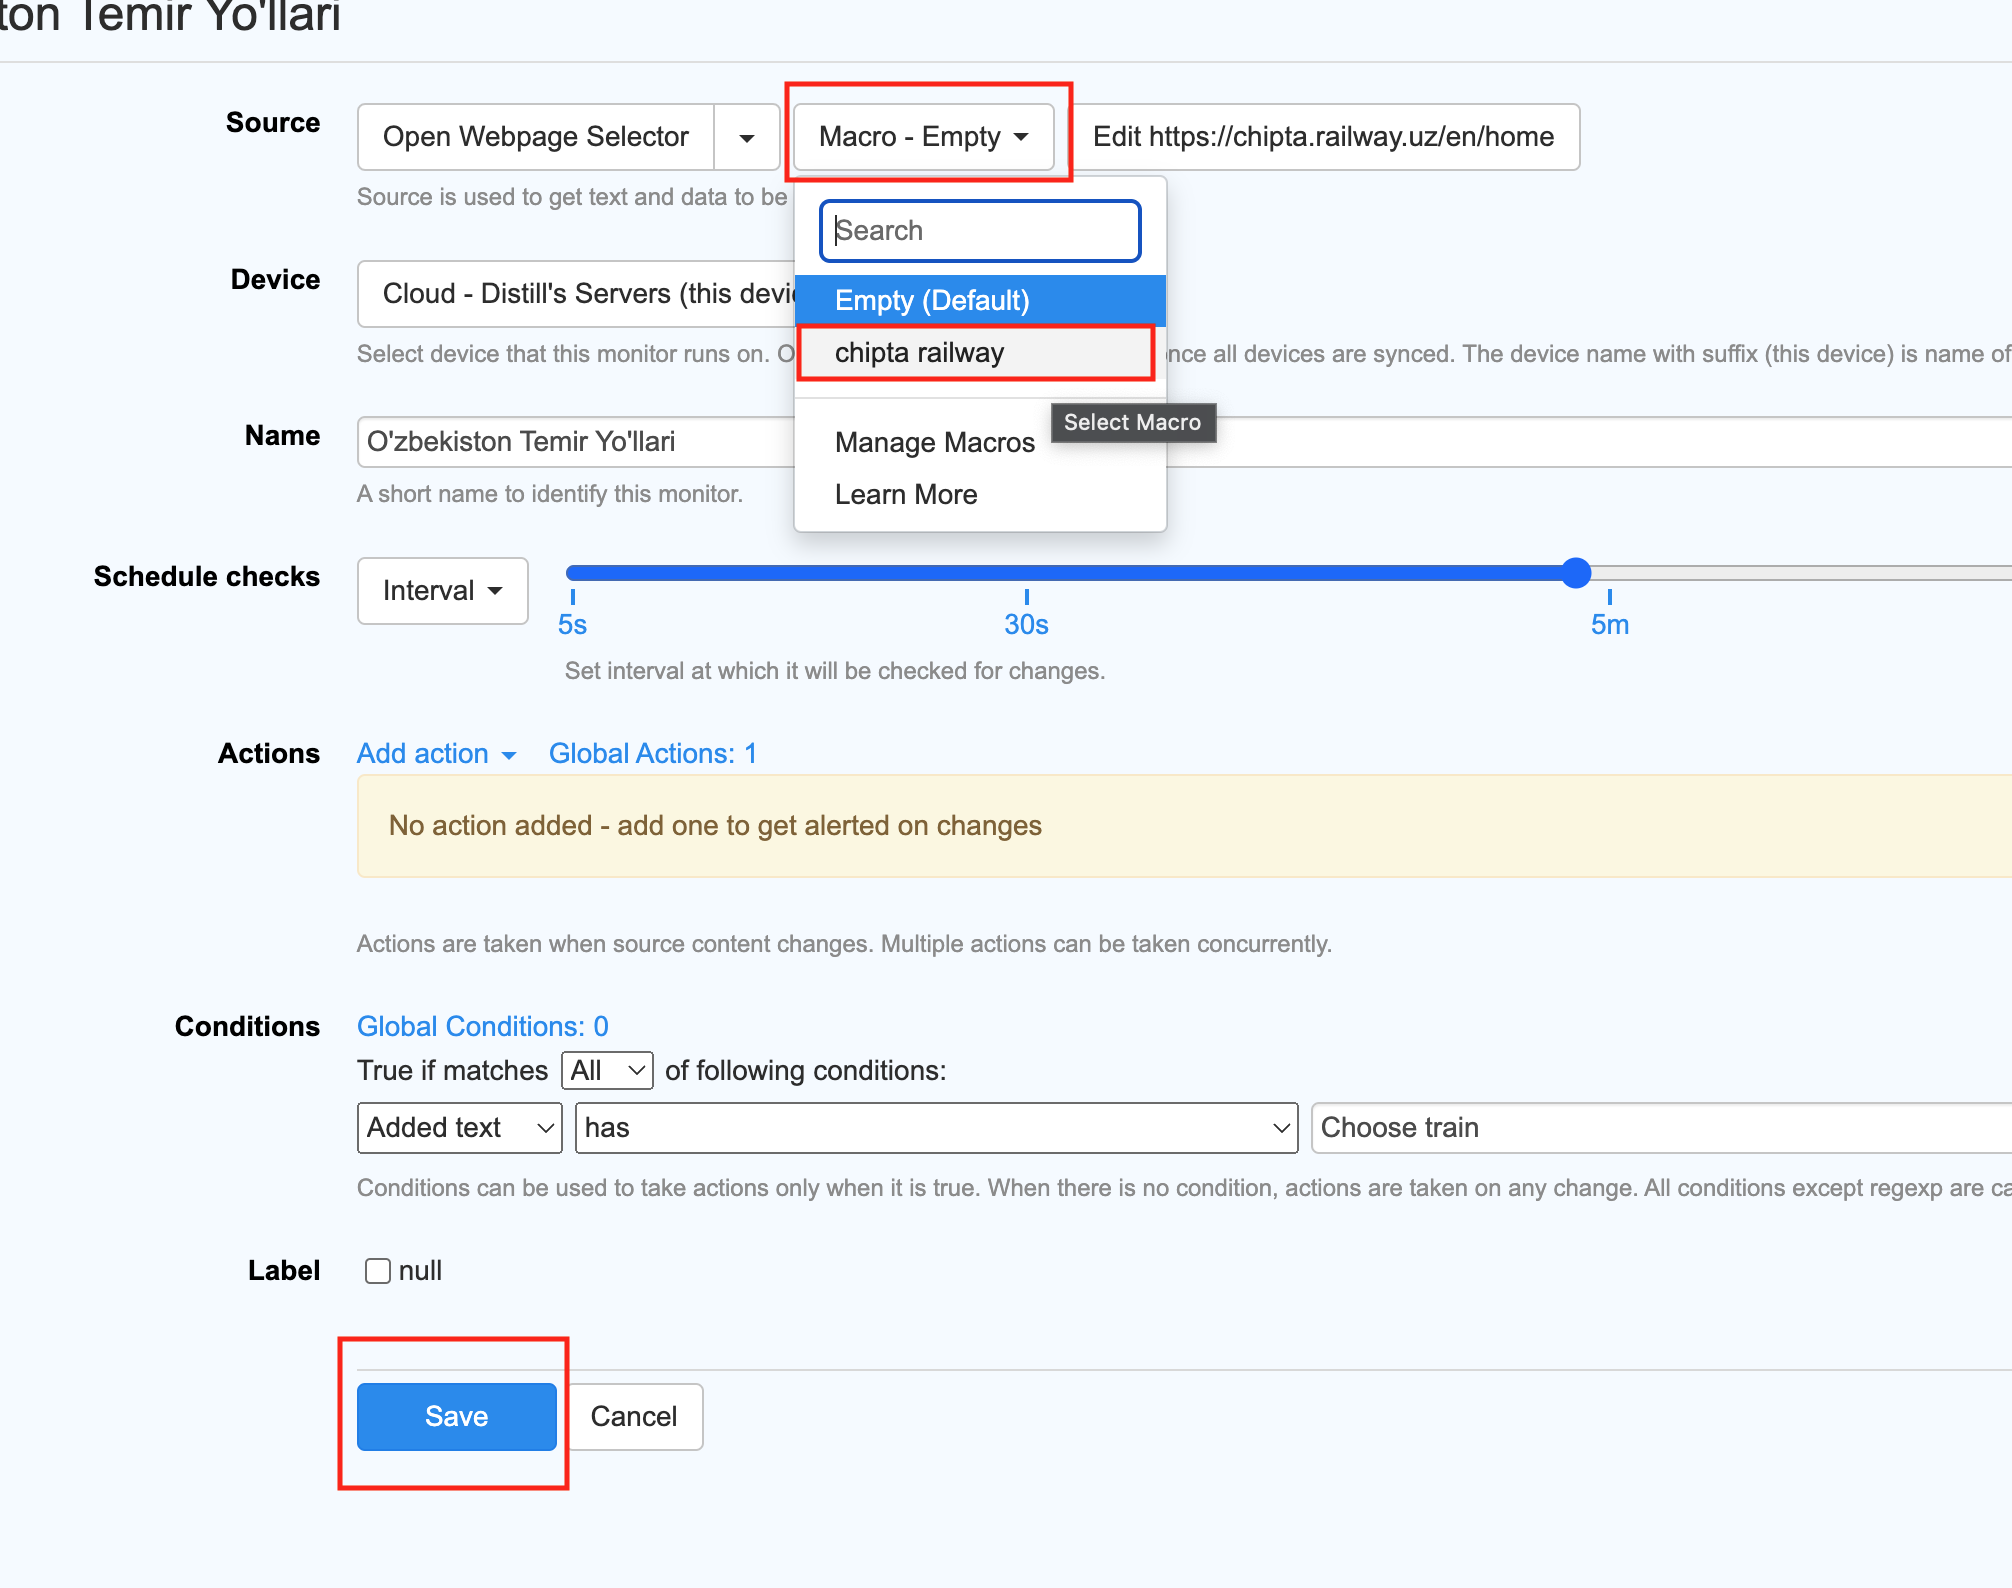
- Choose the
Empty-Macrodropdown and click onchipta railwayoption. Now click save.
Following the above steps should successfully setup the required monitor.
Note:
-
The condition to notify only when trains are available is already added. Add the action that has to happen ( Eg: send email) when condition become true.
-
The macro is set to check for Date ‘March 15, 2023’. You can change that in the Macro config shared in the first step, to check for a different date.
-
The first check might error out, since it will start checking even before you set the macro in the
Edit options. Wait for the second check, after choosing the macro and saving inEdit options.
1 Like
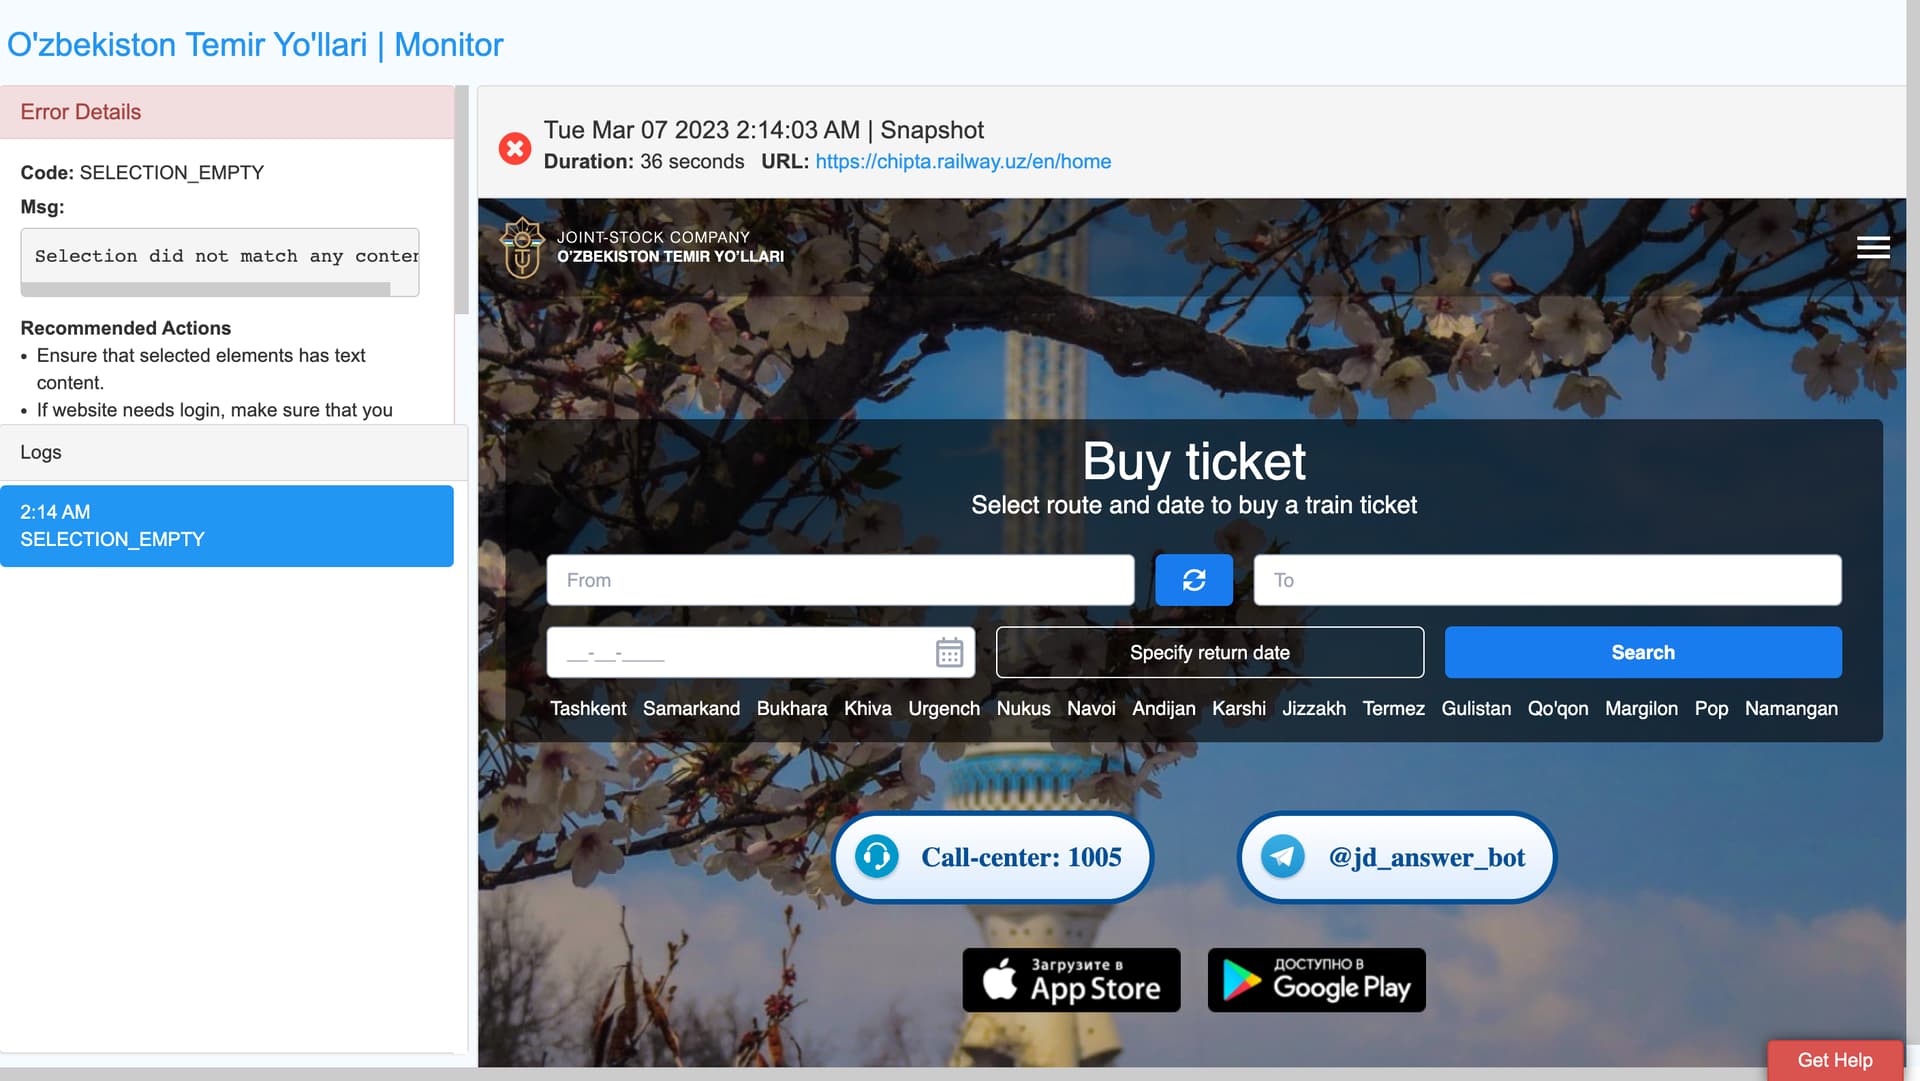
Hey! I followed up but there’s an error.
If I want to track other dates, should I always upload new .json file? is there any convenient way of doing it? and how can modify train departure times? if I want to receive notification for only specific train departure times
Also, I need to choose the departure city and arrival city. how can I do that?
From the snapshot we can see that we are still in the landing page. This means that the steps in the macro has not been played. Did you add the macro to the Edit options of the monitor, As shown below ?
It has to be edited in the macro. There is no way providing them as a parameter as of now. Editing the config wouldn’t work for changing departure city and arrival city. You have to record a new macro.
Here is a link on how to record macros.
How can I do that? I purchased subscription to use macro features; but stuck on configuration
Were you able to record macro by referring to the link shared in the previous message? If you are facing difficulty in creating the macro, can you explain in which step you are stuck? So that I can help you set it up.
Thanks.
I just can’t add departure city and arrival city in Macro; basically, we have 5 variables (earlier I forgot to mention departure city in the variables); date, train type, departure city & arrival city, departure time, and no of seats.
How can I add departure and arrival city in the variable using macros?
Are you trying to create a new Macro, or are you trying to edit the macro config I previously shared ?
I tried to edit the macro you sent
based on the macro you sent (departure is from Samarkand; to Tashkent); now I changed to (from Tashkent to Samarkand) but there’s error
{"macros":[{"meta":{"url":"https://chipta.railway.uz/en/home"},"name":"chipta railway","spec":{},"steps":[["wait_doc",{"frame":0}],["click",["selector",{"meta":{},"type":"css","value":"[placeholder='From']"}],{"x":164.5,"y":11},{"frame":0}],["type",["selector",{"meta":{},"type":"css","value":"[placeholder='From']"}],"tashk",{"frame":0}],["click",["selector",{"meta":{},"type":"css","value":"li.search-trains__dropdown__item:nth-child(3)"}],{"x":63.5,"y":20},{"frame":0}],["type",["selector",{"meta":{},"type":"css","value":".search-trains__input--to"}],"sam",{"frame":0}],["click",["selector",{"meta":{},"type":"css","value":"li.search-trains__dropdown__item:first-child"}],{"x":71.890625,"y":14},{"frame":0}],["click",["selector",{"meta":{},"type":"css","value":"[alt='calendar\\ icon']"}],{"x":12.171875,"y":9},{"frame":0}],["click",["selector",{"meta":{},"type":"css","value":".ngb-dp-day[aria-label$='March 15, 2023']"}],{"x":16.28125,"y":13},{"frame":0}],["click",["selector",{"meta":{},"type":"css","value":"[type='submit']"}],{"x":82.0625,"y":24},{"frame":0}],["wait_for_element",["selector",{"meta":{},"type":"css","value":".direction__heading"}],{"frame":0}]],"version":1}]}
This is a working macro for departure from TASHKENT and arrival at SAMARKAND. Directly editing the previous macro, for swapping departure and arrival, won’t work.
It is easier to record a macro than to edit the config.
All you have to do is, in the macros page:
- Enter the name of macro and URL.
- Click on
Add New Macro. A recorder will open, with a builtin browser. - You just have to enter the departure station, arrival station, date and click on search. The steps will be automatically recorded.
- Click on Save, The macro will be saved.
Please refer to this link for detailed explanation and examples:
–x–
I will add a screen-recording to show how to record a macro, shortly.
I created a New macro: Tash-Sam; however, it’s not working. It’s not showing any notifications with train availability. Should I select train class when I record a new macro? or just departure city, arrival city, and dates would be enough? I only want to get a notification when the train name equals “Afrosiyob”; departure times: 07:28, 08:00 and 08:23. How can add this logic there?